The Secret to Food Photos That
Make You Hungry
Angle, light, and styling — get just these three right and you can shoot café-quality food photos with a smartphone.
Questions you might have
Why do restaurant food photos always look unappetizing?
Most restaurant lighting uses low-CRI yellow fluorescent or LED lights. No matter how well you shoot under that light, colors come out muddy. The solution isn't flash — it's securing a window seat. If there's no natural light, try holding a white phone screen next to the food as a makeshift reflector.
Smartphone food photos vs. camera food photos — what's the real difference?
The key differences are bokeh (background blur) and color depth. Smartphone AI bokeh tends to cut awkwardly around food edges. A camera with a 50mm f/1.8 prime gives natural bokeh that makes food pop with dimension. But if light and styling are the same, the gap is smaller than you'd think — fix the light first.
Angle Selection
Top-down, 45°, or straight-on — the most appetizing angle depends on the food's shape.
Soft Light
Diffused soft light is best for food. Direct harsh light creates hard shadows that make food look unappetizing.
Color & Styling
Background color, dishes, and props — complementary colors and tonal consistency determine the polish of the shot.
Which angle makes food look best?
The best angle depends on the shape of the food. Try all three angles before committing to one.
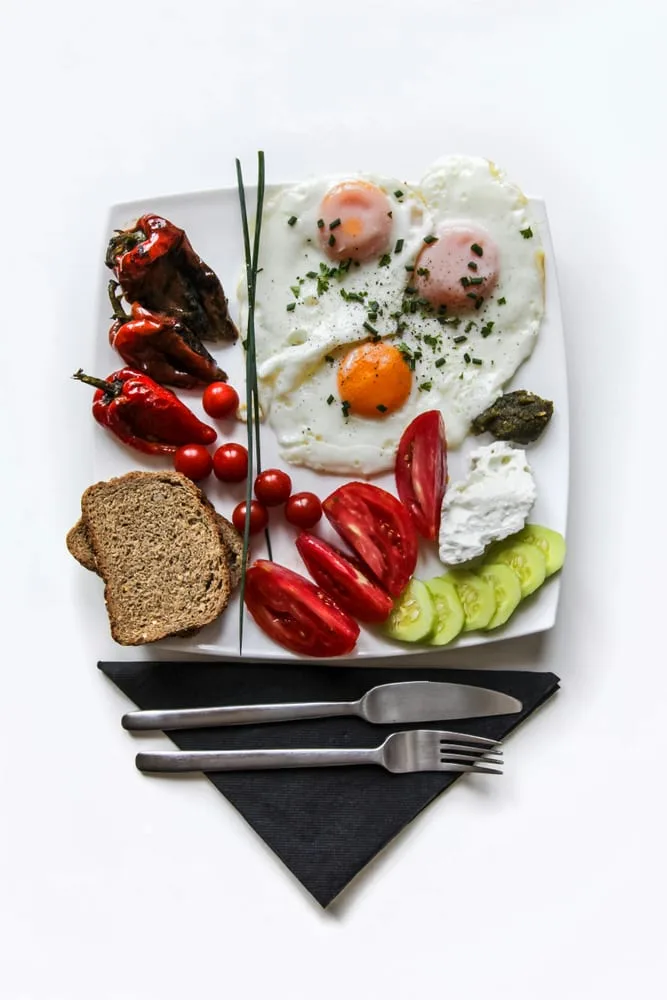
Top-Down (Flat Lay) — 90° overhead
✦ Works best for: Pizza, pasta, salads, rice dishes, bento
Pros: Shows ingredients, colors, and arrangement at a glance. Both props and background contribute to the frame.
Watch out: Tall foods (burgers, cakes) lose their appeal. Requires a tripod or very stable posture.
45° Angle — tilted from table height
✦ Works best for: Coffee & lattes, cakes, soups, steaks
Pros: Shows both height and detail simultaneously. The most natural and universally flattering angle.
Watch out: More background is visible — you'll need to clear or style the background.
Side View — straight horizontal
✦ Works best for: Burgers, sandwiches, layered cakes, tacos
Pros: Shows layers dramatically. Maximizes height and volume impact.
Watch out: Background is fully exposed — background styling becomes critical.
Food Photography Light — Softer Looks Tastier
Light in food photography isn't just about brightness. Hard direct light creates harsh shadows on food surfaces, making it look less fresh.
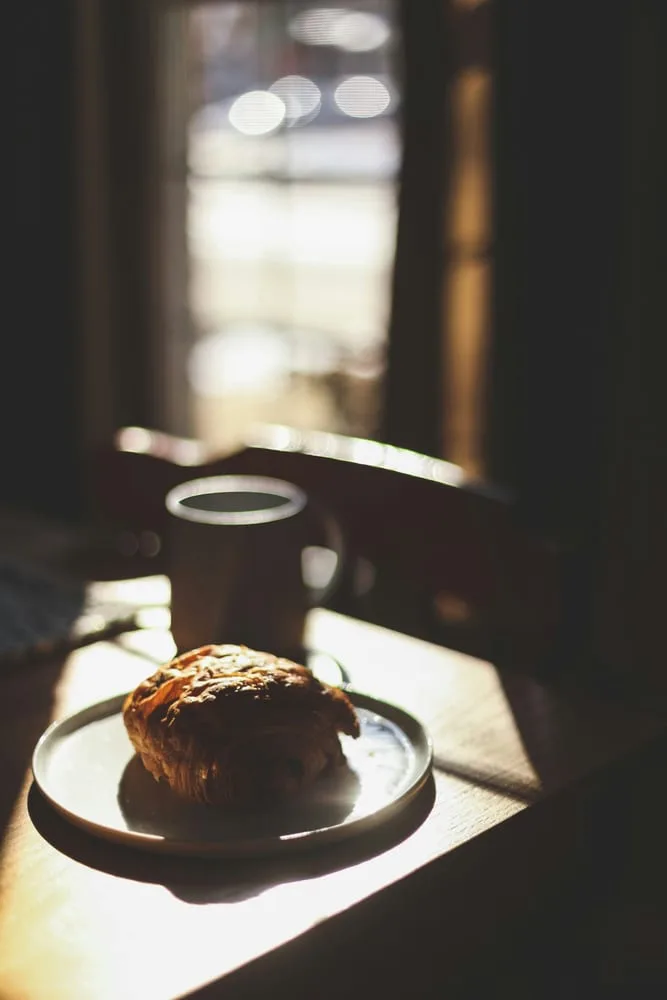
Window Natural Light (Top Recommendation)
Overcast-day window light or a window not in direct sun on bright days. Soft, even light with the most natural colors.
Curtain / Tracing Paper
If direct sunlight through a window is too harsh, hang a thin curtain or tape tracing paper to the glass to diffuse the light.
Artificial Light — LED Panel
For night or low-light environments. Recommended: 5600K (daylight) or 3200K (tungsten) panel with CRI 90+ for natural color rendering.
Reflector
Place white paper or a white foam board on the shadow side of your light source to bounce fill light and create balanced exposure.
Warm tones (3000–4000K) stimulate appetite for bread, grilled food, and coffee. Cool tones (5500K–6500K) suit fresh food like fish, salads, and ice cream. Shoot in RAW for full freedom in post-processing.
expand_more더 알고 싶다면 — 식당 조명에서 살아남는 법
식당 천장 조명은 대부분 CRI 70~80대의 황색 형광등이나 LED입니다. 이 빛에서는 초록 채소가 칙칙하게, 붉은 고기는 갈색으로 찍힙니다.
- 창가 자리 요청: 외부 자연광이 들어오면 천장 조명의 영향이 줄어듭니다.
- 스마트폰 반사광 트릭: 흰 페이지를 띄운 스마트폰을 음식 옆에 세워두면 간이 반사판 역할을 합니다.
- RAW 촬영 후 화이트밸런스 수정: JPG는 카메라가 화이트밸런스를 고정하지만 RAW는 후보정에서 자유롭게 조정할 수 있습니다.
- 카메라 화이트밸런스 수동 설정: 자동(AWB) 대신 형광등(4000K) 또는 수동으로 맞추면 황색 캐스트를 줄일 수 있습니다.
Food Styling Basics
80% of food photography is determined by the background, dishes, and props — not the food itself.
Keep the Background Simple
Bright marble texture, wood table, white linen — backgrounds that let food shine are near-monochromatic with some texture. Busy patterns compete with the food.
Use Complementary Colors
Red foods (tomatoes, strawberries) with green props, yellow foods with purple/blue props — contrast makes colors pop. Stick to three colors max.
The Dish Is Half the Shot
White dishes work with everything and are the safest choice. The food color shouldn't clash with the dish. Food looks most abundant when it slightly overflows the dish edge.
Props Tell the Story
Forks, spoons, raw ingredients (herbs, spices), napkins, a small flower — props that show the food's context add narrative. But props should never become the main subject.
expand_more더 알고 싶다면 — 프로 푸드 스타일리스트의 색 조합 공식
전문 푸드 스타일리스트들이 실제로 쓰는 색 배치 규칙입니다.
- 60-30-10 법칙: 주색 60%(배경·그릇), 보조색 30%(냅킨·소품), 포인트색 10%(가니쉬·꽃). 이 비율이 균형감을 만듭니다.
- 채도 통일: 모든 소품의 채도를 비슷하게 맞추면 어수선해 보이지 않습니다. 채도 높은 음식에는 채도 낮은 소품을.
- 네거티브 스페이스 의도적으로 남기기: 빈 공간을 두려워하지 마세요. 여백이 있어야 음식이 숨을 쉽니다.
- 홀수 원칙: 소품 개수는 홀수(1, 3, 5)가 짝수보다 더 자연스러워 보입니다.
Getting Great Food Photos on a Smartphone
Smartphones are the most convenient tool for food photography. A few settings are all you need to get close to professional results.
Never use flash
Smartphone flash makes food look flat and pale. Always work with natural light or available ambient light.
Turn on the grid
Enable the grid in settings to help with the rule-of-thirds composition and keeping your shot level.
Tap to adjust focus and exposure
Tap the food area on screen to set focus and exposure to that point. After tapping, use the exposure slider to fine-tune brightness.
Turn off HDR
HDR makes food colors look over-processed and unnatural. Disable manual HDR and adjust exposure yourself.
Recommended Gear for Food & Product Photography
You can absolutely start with a smartphone. If you move to a camera, a macro lens or 50mm prime is recommended.
The most accessible combination. A white paper reflector next to a window delivers excellent results.
Zero barrier to entry — with good light and composition, café-quality results are absolutely achievable. The ideal stage for learning light and composition before investing in gear.
Optimized for close food photography. Natural background blur makes food stand out. A flip screen is useful for top-down shooting.
At f/1.8 the background melts away naturally, making food pop with dimension. Background blur is far more natural than smartphone AI bokeh.
Get extremely close to capture food texture and detail vividly. Excellent for product photography too.
1:1 magnification lets you capture ingredient grain, water droplets, and crust texture in full detail. Even more efficient if you combine food and product work.
Creates consistent light for night and indoor shooting. A softbox approximates natural diffused light indoors.
Reproduces the same light regardless of time or weather. Essential for maintaining consistent tone when posting regularly to social media or a blog.
※ Prices are based on 2025 and may vary with exchange rates and discounts.
3-Angle Food Challenge at Home
- →Take one food from today's meal to a window
- →Make a reflector from white paper and prop it on the shadow side
- →Shoot 3 angles — top-down, 45°, and side view — 3 shots each
- →Upload the best shot from your favorite angle to AI
- →Review composition, light, and color feedback, then try editing
More Content to Explore
마지막 업데이트: 2026년 4월